BLOG
Custom Shirts with Cricut Maker 3: The Complete Guide to Perfect Designs!
Creating custom shirts has never been easier, especially with the advanced features of the Cricut Maker 3. This comprehensive guide will walk you through the entire process of designing and making stunning custom shirts. Whether you’re a hobbyist or a seasoned crafter, understanding how to utilize the Cricut Maker 3 effectively will enable you to produce professional-quality designs that stand out. Let’s dive in!
How to Make Custom Shirts with Cricut Maker 3

Step 1: Gather Materials for Shirt Making
Before you start crafting your custom shirts, ensure you have the following materials ready:
- Cricut Maker 3: Your essential cutting machine.
- Heat Transfer Vinyl (HTV): Available in various colors and finishes.
- T-Shirts or Apparel: Choose high-quality, compatible fabric for best results.
- Cricut EasyPress or Iron: For adhering the vinyl to the fabric.
- Design Software: Such as Cricut Design Space, for creating your shirt designs.
With these materials on hand, you’re ready to begin your creative journey.
Step 2: Design Your Custom Shirt
The design process is one of the most exciting parts of making custom shirts. Follow these steps:
- Open Cricut Design Space: Use this software for easy layout and design.
- Create or Upload Designs: You can either create designs from scratch or upload images and text.
- Position Your Design: Make sure it fits well on the shirt template provided in Design Space.
Many users find inspiration through trending design themes, such as personalized quotes or seasonal graphics, allowing them to tap into the latest trends.
Best Materials for Cricut Shirt Making
When it comes to making high-quality custom shirts, choosing the right materials is crucial. Below is a comparison table detailing the types of heat transfer vinyl and recommended shirt fabrics.
| Material Type | Description | Best Use |
| Heat Transfer Vinyl | Flexible and durable; available in many colors | Ideal for vibrant, long-lasting designs |
| Premium HTV | Thicker, easier to apply, and has a soft finish | Suitable for intricate designs and logos |
| Performance Fabric | Breathable and moisture-wicking | Perfect for athletic wear and team apparel |
| Cotton Fabric | Soft, comfortable, and breathable | Great for casual wear, easy to work with |
Types of Heat Transfer Vinyl
HTV generally falls into several categories, each serving different design purposes:
- Standard HTV: Basic option for general use; easy application.
- Glitter HTV: Adds sparkle to designs but requires a longer press time.
- Flocked HTV: Offers a textured finish suitable for designs that need a plush feel.
Choosing the appropriate vinyl can significantly affect the outcome of your custom shirt.
Recommended Shirt Fabrics
The fabric you select influences both the feel and durability of the custom shirt. Consider the following:
- 100% Cotton: Soft and great for printing.
- Polyester: Suitable for performance wear; works best with sublimation printing.
- Blends: Cotton/polyester blends combine comfort with durability and are versatile for various designs.
How to Use Heat Transfer Vinyl with Cricut Maker 3

Once you’ve selected your materials, mastering the use of heat transfer vinyl with your Cricut Maker 3 is next.
Preparing the Vinyl
Preparation is vital for achieving clean cuts and perfect designs:
- Measure Your Design: Ensure that it’s the right size for your shirt.
- Mirror Your Image: For HTV, always mirror the design before cutting to ensure it adheres correctly.
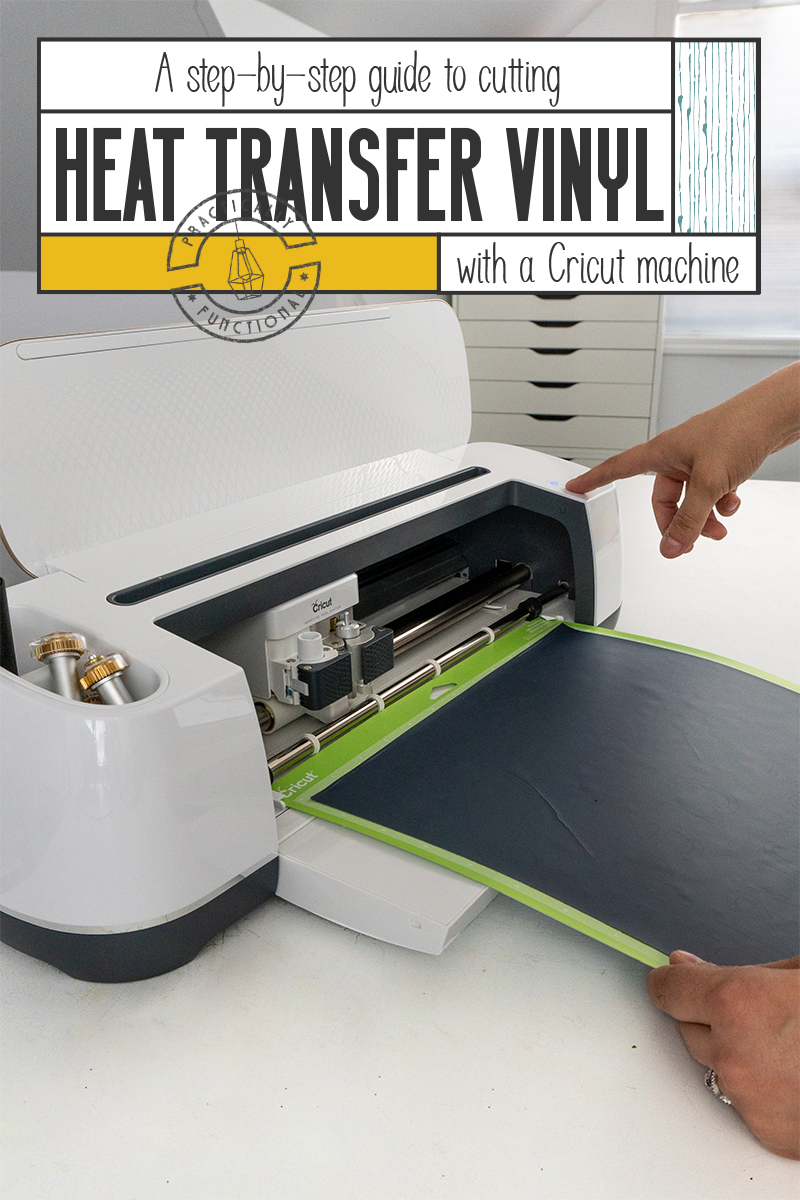
- Place the Vinyl: Position the shiny side of the vinyl down on the cutting mat.
Cutting Settings for Cricut Maker 3
Setting up your Cricut Maker 3 for cutting is straightforward. Follow these steps:
- Select Material Type: In the design interface, choose “Heat Transfer Vinyl.”
- Blade Settings: Use the fine-point blade for precise cuts; ensure it’s clean and sharp.
Following these cutting settings will help prevent issues like incomplete cuts or vinyl tearing, enabling you to produce professional-level custom shirts.
After preparing everything correctly and adjusting the necessary settings, you’ll be well on your way to creating beautiful custom shirts with your Cricut Maker 3.
Cricut Maker 3 Settings for Shirt Making
Adjusting Blade Settings
When setting up your Cricut Maker 3 for shirt making, it’s crucial to select the appropriate blade setting. The machine supports various blades, including the Fine Point Blade and the Rotary Blade, each suited for different materials.
- Fine Point Blade: Ideal for most iron-on vinyls and cardstock. It’s perfect for intricate designs on shirts.
- Rotary Blade: Best for fabric cutting, this blade can cut through cotton, canvas, and other textile materials effectively.
To adjust the blade setting, navigate to the machine settings on the Cricut Design Space software. Select the material you’re using; for instance, if you are cutting heat transfer vinyl (HTV), ensure the blade is set to “Iron-On” to achieve optimal cutting precision.
Choosing the Right Material on the Machine
Selecting the right material is important for achieving high-quality results. The Cricut Maker 3 offers a wide range of preset material settings. To ensure the best outcome for your shirts, consider the following materials:
- Heat Transfer Vinyl (HTV): This is the most popular choice for custom shirts. High-quality HTV comes in various finishes, such as glossy, matte, and metallic.
- Cotton Fabric: If you’re looking to create custom fabric designs, use cotton or cotton blends. For these materials, ensure the settings are optimized for fabric cutting.
To select the correct material, simply adjust the material option in the Design Space software. For example, if you choose “Iron-On,” your machine will automatically calibrate the blade depth and pressure for that particular substrate.
Cricut Design Ideas for Custom Shirts
Popular Themes and Trends
When designing custom shirts, certain themes resonate more with audiences. According to recent trends, popular themes include:
- Inspirational Quotes: Text designs featuring motivational or uplifting phrases are widely embraced, particularly among the youth demographic.
- Seasonal Designs: Shirts related to holidays or seasons, such as Halloween or Christmas, see a spike in demand, making them a great choice for seasonal marketing.
- Niche Interests: Customized designs catering to hobbies or professions, like fitness or teaching, can effectively target specific groups.
Statistics show that custom apparel sales increase by approximately 20% during peak seasons, illustrating the potential for profit during these times.
Creative Design Techniques
To stand out in the crowded custom shirt market, employing creative design techniques is key. Consider the following methods:
- Use of Layering: Combining different colors and textures through layering can add depth to your designs. This is particularly effective with HTV, where you can layer multiple shades.
- Incorporating Images: Mix text with compelling graphics, such as illustrations or photographs, to create visually interesting designs. Tools like Canva can help in designing these graphics before importing them into Cricut Design Space.
- Customization: Adding names or numbers (like those seen on sports jerseys) allows for personalization, making shirts appealing for gifts or events.
How to Layer Vinyl on Shirts with Cricut Maker 3
Planning Your Layering Design
Layering vinyl requires careful planning to ensure that each layer adheres properly and looks cohesive. Here are key steps:
- Design in Layers: In Cricut Design Space, set up your design in separate layers. Keep in mind that lighter colors should typically go underneath darker colors to avoid visibility issues.
- Use Registration Marks: Adding small marks outside of your design can help align layers effectively when applying them to the shirt.
- Calculate Layer Order: Strategically determine which layers should be cut first. Generally, begin with the base layer and work upward to the topmost piece.
Application Techniques for Layered Vinyl
Applying layered vinyl requires precision and patience. Here are some effective application techniques:
- Heat Press or Iron: Use a heat press for maximum pressure and even heat distribution. If using an iron, ensure you select the correct setting for your vinyl and apply pressure evenly.
- Weeding Carefully: Weed out excess vinyl before layering; this ensures that only your designed elements are placed on the shirt.
- Use a Teflon Sheet: Place a Teflon sheet over the design when applying heat to prevent direct contact and protect the vinyl from scorching.
How to Mirror Designs for Cricut Iron-On
To create a polished and professional look for your custom shirts, mirroring your designs is essential before cutting. Here’s how to do it effectively:
- Activate Mirror Setting: In Cricut Design Space, ensure you enable the “Mirror” option when selecting your design for HTV. This flips your design horizontally, allowing for correct placement on the shirt.
- Double-Check Before Cutting: Always view the final design in the preview mode to make sure everything is flipped correctly and appears as intended.
By understanding and implementing these techniques and settings when using the Cricut Maker 3, you can create custom shirts that are both appealing and of high quality, satisfying the needs of your customers while enhancing your crafting skills.
Understanding Mirroring Technique
The mirroring technique is essential when creating custom shirts using the Cricut Maker 3, particularly for designs that involve heat transfer vinyl (HTV). This method ensures that your design appears correctly on the fabric after it is transferred. When you cut HTV, the design must be mirrored or flipped horizontally so that when it is applied to the shirt, it reads the right way. Not mirroring the design may result in a backward image – easy to identify but frustrating once the vinyl is applied.
For example, if your design includes text, such as “Family Reunion 2023,” failing to mirror the design would lead to it appearing as “3202 Noit U” once transferred. Therefore, always remember: when working with HTV, mirror all text and intricate designs before cutting.
Step-by-Step Mirroring Process
- Open Cricut Design Space: Start by accessing your design within the Cricut Design Space software.
- Select the Design: Click on the design you wish to create. If it includes text, ensure you highlight it.
- Access the Mirror Option: On the right side menu, locate the “Make It” button and click it. You will notice an option to mirror the image appears. Toggle the switch to enable mirroring.
- Choose Your Material: Select “Iron-on” from the material list to ensure the machine knows you’re working with HTV.
- Cut the Design: Once mirrored, proceed to cut the design. Ensure your blade is prepared for cutting HTV specifically.
- Transfer the Design: Once cut, weed the excess vinyl carefully, ensuring your design remains intact, and transfer to your shirt using a heat source.
This process ensures that your custom shirts appear flawless and professional, ready for any family reunion or event.
Using Cricut Maker 3 for Family Reunion Shirts
Creating family reunion shirts is a beautiful way to honor family bonds while providing everyone with a special memento. With Cricut Maker 3, the customization options are virtually limitless.
Design Ideas for Family Gatherings
- Family Tree Graphics: Create intricate family trees that can be personalized with names, dates, and branches representing family members.
- Group Phrases: Use catchy phrases that capture the spirit of the reunion, like “Together Again” or “Family: The Ties that Bind.”
- Family Photos: Utilize iron-on photo transfer techniques to display cherished family memories.
Statistics indicate that events with personalized merchandise can enhance participant satisfaction by 30%, making custom shirts an ideal choice.
Personalization Techniques for Family Shirts
- Names and Initials: Personalizing each shirt with individual names or initials adds a special touch and fosters a sense of belonging among family members.
- Family Nicknames: Using fun or common family nicknames creates inside jokes and enhances bonding among attendees.
- Color Coordination: Selecting a palette that reflects your family’s spirit or the reunion theme will ensure cohesiveness in your shirts.
Tips for Weeding Vinyl on Custom Shirts

Weeding is the process of removing excess vinyl from your design after cutting. It can seem tedious, but employing effective strategies can significantly ease the task.
Best Practices for Weeding
- Use a Bright Light: Ensure your workspace is well-lit to help identify areas that require weeding.
- Start from the Corner: Begin ripping the vinyl from one corner. It is advisable to peel on an angle to avoid tearing the design.
- Work Slowly: Take your time while weeding to ensure intricate elements are preserved and minimize the risk of damaging your design.
- Regular Breaks: Give your hands a break if you’re working on larger projects to maintain precision and comfort.
Tools to Assist in Weeding
Several tools can assist in the weeding process:
| Tool | Purpose |
| Weeding Tool | Pinpoint removal of excess vinyl |
| Tweezers | Allow for detailed undressing of small elements |
| Lightbox | Provides improved visibility for small details |
| Vinyl Scraper | Smoothly lifts and weeds larger designs |
Incorporating these tools can make weeding not only more efficient but also more accurate.
How to Make Professional-Looking Shirts with Cricut Maker 3
Achieving a professional finish on your shirts involves several final touches that elevate your designs.
Finishing Techniques for a Polished Look
- Heat Application: Use a heat press when applying design to ensure even pressure and heat distribution, leading to a long-lasting bond.
- Proper Temperature Settings: Always refer to the HTV manufacturer’s instructions for optimal heat settings, as improper temperatures can damage the vinyl.
- Post-Application Care: Allow the design to cool before peeling the transfer sheet. This helps in preventing any unintended lifting of your vinyl.
- Washing Instructions: Educate recipients on proper washing and drying instructions to maintain the integrity of their shirts. Generally, cold water washing and air drying are advisable.
By following these guidelines and utilizing the full capabilities of the Cricut Maker 3, you can create custom shirts that resonate with your family while looking polished and professional.
Quality Control Tips for Custom Shirts
When creating custom shirts with the Cricut Maker 3, maintaining quality control is vital to ensure the final product meets your expectations and those of your customers. Here are essential strategies to help you uphold high quality in your shirt designs:
1. Material Selection
Choosing the right fabric is foundational to the quality of your custom shirts. Consider the following types of materials:
- Cotton: Soft, breathable, and widely appreciated for its comfort; ideal for casual wear.
- Polyester: Durable and wrinkle-resistant, suitable for athletic shirts and vibrant prints.
- Blends: Combining fabrics can provide the best of both worlds, yielding comfort and durability.
Proper selection can significantly affect durability and print quality. For example, using high-quality cotton can enhance print adhesion, reducing the chance of peeling or cracking over time.
2. Design Testing
Before finalizing a design, it’s crucial to execute test prints. This allows you to assess factors such as:
- Print clarity
- Color vibrancy
- Overall design placement
Conduct test prints on scrap fabric or inexpensive shirts to fine-tune designs. For instance, if a design looks great on-screen but printed poorly, you may need to adjust the color saturation in the software or the transfer technique used.
3. Proper Cutting and Transfer Techniques
Ensure the Cricut Maker 3 is set correctly for the specific material you’re using. The machine’s fine-tuned settings can impact:
- Cut accuracy
- Vinyl adherence
For example, if cutting heat transfer vinyl (HTV), ensure the blade depth and pressure settings are appropriately adjusted. A misalignment could result in uneven cuts, which can compromise the transfer process.
4. Post-Production Quality Checks
After the shirts are printed, conduct quality assessments before distribution:
- Inspect for print defects (blurring, incomplete transfers).
- Check for alignment and placement accuracy.
- Review stitching and finishing on the shirts to ensure durability.
Establish a checklist to streamline this quality assurance process. This can lead to catching errors before they reach customers, improving overall satisfaction.
5. Longevity Tests
To assure customers of the product’s longevity, consider performing wash tests on sample shirts. Assess:
- Fade resistance
- Peeling or cracking of prints
- Durability of the fabric itself
For example, laundering a sample shirt multiple times can reveal how well your chosen materials and print techniques hold up under regular use.
Conclusion
In summary, maintaining quality control when creating custom shirts with the Cricut Maker 3 is paramount to achieving successful and satisfactory results. It involves careful material selection, rigorous design testing, precise cutting and transfer techniques, thorough post-production inspections, and reliable longevity assessments. By implementing these quality control tips, you can ensure that your custom creations not only meet your standards but also delight your customers, thereby enhancing your brand’s reputation and encouraging repeat business. Quality should never be compromised, and with due diligence in these areas, your custom shirt designs can thrive in a competitive market.

