BLOG
Create Beautiful Wedding Crafts with Your Cricut Maker 3: A Complete Guide
Crafting beautiful wedding items is not just a trend, it’s a heartfelt way to add a personal touch to one of life’s most significant events. With the Cricut Maker 3, you can transform your wedding vision into reality. This guide will walk you through the essentials of using your Cricut Maker 3 to create stunning wedding crafts, including invitations, décor, and personalized gifts.
How to Use Cricut Maker 3 for Wedding Crafts

Getting Started with Your Cricut Maker 3
Setting up your Cricut Maker 3 is the first step toward creating remarkable wedding crafts. Start by unboxing your machine and connecting it to your computer or mobile device via Bluetooth. The Cricut Design Space software must be downloaded, where you’ll design your projects and adjust dimensions to fit your wedding theme.
Basic Functions and Features
The Cricut Maker 3 offers a wide array of functions that are perfect for wedding crafts:
- Smart Materials: These allow for matless cutting, saving you time and providing cleaner cuts for large projects.
- Adaptive Tool System: This enables the use of various tools for different materials, perfect for creating everything from delicate invitations to sturdy décor pieces.
- Print then Cut: You can print designs and then cut around them, allowing for high customization of items like stickers and tags.
Best Materials for Wedding Crafts with Cricut Maker 3

Choosing the right materials is essential for achieving the desired aesthetic and quality in your wedding crafts.
Paper Choices for Invitations and Decorations
Paper type can elevate your invitations and décor. Here are some popular options:
- Cardstock: Available in various colors and finishes, it’s ideal for crafting invitations that are both sturdy and elegant.
- Metallic and Glitter Papers: Use these to add sparkle to place cards or menu inserts, creating a glamorous touch.
- Vellum: This translucent option works beautifully for overlays on invitations, allowing for ethereal effects.
Vinyl and Iron-on Materials for Personalized Items
Personalized details can greatly enhance your wedding theme. Consider:
- Permanent Vinyl: Perfect for custom signage, cake toppers, or window decals, offering durability.
- Heat Transfer Vinyl (Iron-on): Ideal for personalized T-shirts, tote bags, or decorations, easily transferred with a heat press or iron.
Wedding Invitation Ideas Using Cricut Maker 3
Creating bespoke invitations can set the tone for your wedding. Here are some innovative ideas:
Elegant Card Designs
Designing elegant cards with your Cricut Maker 3 involves:
- Laser-Cut Invitations: Use intricate designs to cut out lace patterns for a wedding invitation that impresses your guests.
- Layered Cards: Combine different colors and textures of cardstock to create a three-dimensional effect, making your invitations stand out.
Unique Envelope Options
The envelope is as important as the invitation itself. You can personalize your envelopes by:
- Custom Shapes: Create envelopes in unique shapes that reflect your wedding theme—like heart-shaped or tri-fold options.
- Addressing with Vinyl: Use vinyl to create beautifully styled addresses on your envelopes, providing a polished finish.
DIY Wedding Decorations with Cricut Maker 3

Creating Centerpieces
Centerpieces are a focal point of wedding tables, and crafting them with a Cricut Maker 3 allows for individualized designs tailored to your wedding theme. With the ability to cut various materials such as cardstock, felt, and wood, you can create stunning floral arrangements, personalized signs, or intricate table numbers.
For example, consider creating a layered floral centerpiece. Use the Cricut to cut different flower shapes from vibrant cardstock or faux-leather. Assemble these flowers into a visually striking bouquet placed in a decorative vase. Statistics from wedding planning sources indicate that unique centerpieces can enhance the overall aesthetic and guest experience, making them a highlight of the event.
Designing Banners and Table Settings
Banners and table settings serve as important elements that tie together the wedding theme. With the Cricut Maker 3, you can design custom banners to welcome guests or celebrate newlyweds with personalized messages.
Using the Design Space software, select fonts and sizes that match your wedding palette. For table settings, consider creating name cards and menu cards that reflect your theme; for instance, a rustic wedding might include kraft paper elements with handwritten fonts. According to recent surveys, couples who incorporate customizable elements into their weddings report higher satisfaction levels with their event’s overall coordination.
How to Create Custom Wedding Favors with Cricut Maker 3

Selecting the Right Materials
Choosing the right materials for wedding favors is crucial for both aesthetics and functionality. The Cricut Maker 3 can cut a range of materials, including cardstock, vinyl, and transparent acetate.
For example, if you’re opting for small plant favors, you might consider using kraft paper boxes decorated with vinyl stickers bearing the couple’s names and wedding date. Alternatively, acrylic shapes engraved with a personal message can serve as timeless keepsakes. Research shows that personalized wedding favors are more likely to be kept by guests, making them a memorable part of the day.
Step-by-Step Favor Assembly
Creating wedding favors can be straightforward when following a systematic approach. Here’s a brief step-by-step process:
- Design the Favor: Use Cricut Design Space to create a template for your favor box or tag.
- Cut the Material: Load your material into the Cricut Maker 3 and let it cut the design.
- Assemble the Favor: Fold and secure the favor boxes; attach personalized tags using ribbons or twine.
- Presentation: Arrange them neatly on a favor table for guests to grab as they depart.
This assembly method not only streamlines the process but also allows ample opportunity for personalization, enhancing the overall experience for guests.
Designing Monograms for Weddings with Cricut Maker 3
Monogram Design Tips
Monograms are a classic wedding element that can add a sophisticated touch. When designing monograms with your Cricut Maker 3, consider the following tips:
- Choose Fonts Wisely: Select fonts that complement each other; typically, a combination of script and sans-serif works well.
- Keep It Simple: Aim for a design that’s recognizable and easy to read. Overly intricate designs may lose clarity when scaled down.
- Incorporate Symbols: Consider adding meaningful symbols or motifs that reflect your relationship, such as flowers or hearts.
According to design experts, a well-crafted monogram can serve as a cohesive element throughout your wedding, appearing on invitations, signage, and even attire.
Monogram Application on Wedding Items
Utilizing monograms effectively means applying them across various wedding items. The Cricut Maker 3 allows you to personalize items such as:
- Wedding Invitations: Use monograms as a sealing element or an elegant feature on the front.
- Table Linens: Create custom napkins or table runners featuring your monogram.
- Guest Books: Personalize your guestbook cover using your monogram for a personal touch.
By integrating monograms into these items, you create a unified and polished look for your wedding.
How to Make Wedding Signage with Cricut Maker 3
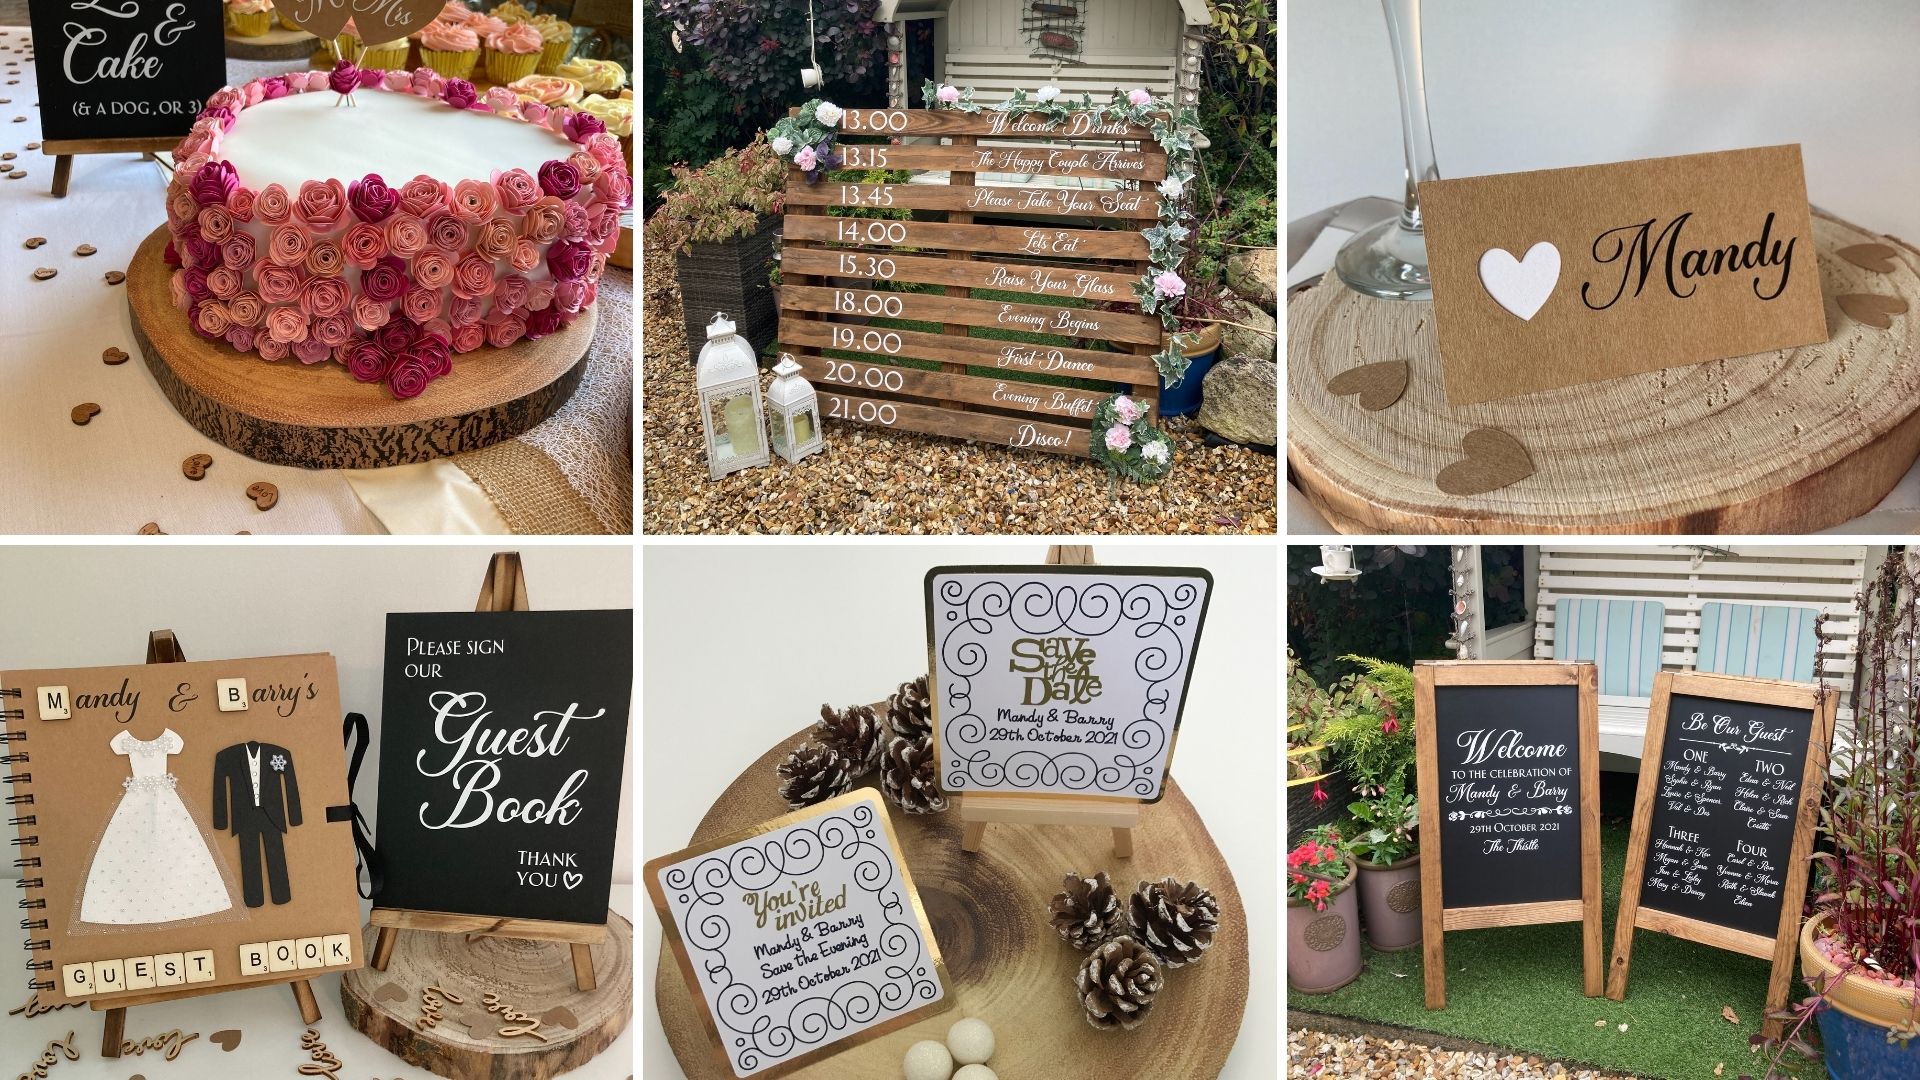
Creating eye-catching signage is an essential part of wedding planning. The Cricut Maker 3 enables you to produce professional-quality signs in various styles and materials.
Start by determining the purpose of the signs: will they direct guests, provide information, or act as decorative elements? Once you have clarity, use Cricut Design Space to develop your sign’s layout. Whether going for a rustic chalkboard look or an elegant acrylic sign, the versatility of the Cricut Maker can accommodate all designs.
For instance, use vinyl lettering for a welcome sign on a wooden board, or create an elegant seating chart on poster board. Data suggest that well-placed signs can significantly improve the flow of an event, allowing guests to navigate seamlessly without confusion.
In summary, the Cricut Maker 3 empowers couples to craft personalized and beautiful wedding elements that reflect their unique style, ensuring a memorable and cohesive wedding experience.
Types of Signage Needed for Weddings
Signage plays a pivotal role in guiding guests, setting the tone, and enhancing the overall visual appeal of a wedding. Below are some essential types of signage commonly used at weddings:
| Type of Signage | Purpose | Example |
| Welcome Signs | Greet guests upon arrival | A large wooden sign with “Welcome to Our Wedding!” |
| Directional Signs | Help guests navigate the venue | Signs indicating the ceremony or reception area |
| Table Numbers | Identify seating arrangements | Each table displaying a unique number or theme |
| Menu Boards | Show food and drink options | A chalkboard listing the dinner menu |
| Photo Booth Backdrops | Create a fun and festive area for photos | Custom-designed backdrop with the couple’s names and wedding date |
| Exit Signs | Guide guests towards exit points | Clear signs showing “Thank You for Celebrating With Us!” |
Each of these signage types can be beautifully crafted using the Cricut Maker 3, allowing for both creativity and personalization.
Design Ideas and Tips
When creating wedding signage, consider the following design ideas and tips:
- Color Scheme: Choose colors that match the wedding theme. For instance, a rustic wedding may benefit from earth tones, while a beach wedding might use aqua and white.
- Fonts: Select fonts that are easily readable yet stylish. Script fonts add elegance, while sans-serif can offer a modern touch.
- Materials: Use materials suitable for the venue. Wood, acrylic, and paper signs can all work depending on the ambiance.
Utilizing the Cricut Maker 3 allows for intricate designs, helping to achieve the desired aesthetic effortlessly.
Using Cricut Maker 3 for Bridal Shower Crafts
The Cricut Maker 3 is not only ideal for weddings but also for bridal shower crafts, allowing for unique and personalized creations.
Fun and Creative Shower Decorations
Cricut Maker 3 can be employed to create themed decorations that resonate with the bride-to-be’s personality and hobbies. Consider crafting items like:
- Banners: Create custom banners that reflect the theme of the shower, such as “She Said Yes!”.
- Table Centerpieces: Use the machine to cut flowers or other thematic elements for centerpieces, adding dimension and color.
- Games: Design fun game elements like “Who Knows the Bride Best?” cards for guests.
Personalized Gifts and Invitations
Creating personalized gifts and invitations can make a bridal shower special. Some ideas include:
- Invitations: Design and cut custom invitations that can feature the shower theme and details. Layering different materials can increase visual interest.
- Gifts: Create monogrammed items such as coasters, tote bags, or wine glasses that guests can take home as keepsakes.
Tips for Planning a Cricut Wedding Craft Project
Successful crafting requires thorough planning. Here are tips to streamline the process:
Project Planning and Time Management
Start by creating a detailed timeline for each craft project. Determine:
- Milestones: Identify key milestones, such as when to finalize designs, gather materials, and complete projects.
- Scheduled Work Sessions: Allocate specific times for crafting to avoid last-minute stress.
By organizing your schedule effectively, you can ensure each project is completed on time.
Budgeting for Materials
When working with a Cricut Maker 3, budgeting is crucial. Consider the following steps:
- List Required Materials: Create a comprehensive list of all supplies needed, including vinyl, cardstock, and tools.
- Research Costs: Compare prices at multiple suppliers to find the best deals and discounts.
- Set a Cap: Establish a maximum spending limit per project to keep overall expenses in check.
Being mindful of your budget can help maximize your creative output without overspending.
How to Personalize Wedding Gifts with Cricut Maker 3
Personalization adds a meaningful touch to gifts and can be easily accomplished with the Cricut Maker 3.
Gift Ideas to Personalize
Here are some thoughtful gift ideas that can be customized:
- Photo Frames: Use vinyl to personalize frames with the couple’s names or their wedding date.
- Keepsake Boxes: Create a decorative box where the couple can store memorabilia from their wedding day.
- Customized Cutting Boards: Personalize boards with family names or special dates, combining practicality with sentiment.
These personalized gifts not only serve utility but also become treasured mementos of the couple’s special day.
Techniques for Personalization
Personalization is key to making your wedding crafts truly unique and reflective of the couple’s individual style. With the Cricut Maker 3, you have multiple techniques at your disposal to bring customization to life.
Custom Monograms
Creating a custom monogram is a classic way to personalize wedding items. You can use your Cricut Maker 3 to cut vinyl or cardstock into stunning monogram designs. Consider layering different colors for a more sophisticated look. For example, a couple’s initials surrounded by floral designs can be used on invitations, table numbers, and guest favors. According to a survey conducted by WeddingWire, 67% of couples indicate that they incorporate initials into their wedding decor.
Engraving
Engraving is another excellent technique for personalization. With the engraving tool for the Cricut Maker 3, you can personalize items such as metal cake toppers, glassware, or wooden signs with names, dates, or special messages. This technique adds a touch of elegance that can make keepsakes memorable for years. Some couples have used engraved coasters as both decor and functional guest favors.
Embellishing with Iron-On Transfers
Iron-on transfers offer another way to add personalized touches. You can create custom designs that can be transferred onto fabrics such as tote bags, napkins, or even shirts for the wedding party. This technique is particularly effective for cohesive bridesmaid gifts or groomsmen accessories. Example designs include “Bridesmaid” or “Groom’s Squad,” which can enhance the visual narrative of the wedding day.
Using Patterns and Textures
Another aspect of personalization is incorporating various patterns and textures into your designs. The Cricut Maker 3 can cut intricate patterns into a variety of materials, such as leather, cardstock, or felt. For instance, unique lace patterns cut into paper can create elaborate wedding invitations or place cards. Statistics from the Knot show that 45% of brides opt for custom invitations, highlighting the importance of personalized options.
Color Customization
Color plays a crucial role in setting the mood of a wedding. The versatile color options available with Cricut materials allow for complete customization of your wedding crafts. For a rustic-themed wedding, earthy tones; for a beach wedding, aquamarine shades; and for a glamorous affair, metallic finishes are all viable choices. Utilizing color schemes can create a consistent aesthetic throughout various craft pieces.
Digital Templates
The Cricut Design Space offers a variety of digital templates that can simplify the personalization process. Couples can either select ready-made designs or create custom ones with specific elements or themes in mind. This can be especially helpful for those who may not have a strong background in crafting but still want to incorporate touches that reflect their personalities.
Layering Techniques
Layering different materials can add depth and richness to your crafts. For instance, using a combination of patterned paper and solid colors can create beautiful layered invitations or signage. Layered elements can also form a collage effect that is visually appealing. This technique allows for extensive creativity, leading to detailed and dynamic designs that capture attention.
Printable Templates
Lastly, printable designs are a great option for couples looking to produce personalized items quickly. You can create artwork that showcases a couple’s love story or their journey together, which can later be printed and framed or included in your wedding program. According to a study by Brides, personalized items resonate strongly with guests and create lasting memories.
In conclusion, utilizing the Cricut Maker 3 to craft personalized wedding items opens up a world of possibilities for creativity. Techniques such as custom monograms, engraving, iron-on transfers, and more allow couples to infuse their personalities into every aspect of their wedding. As personalization remains a significant trend in weddings, leveraging these techniques can significantly enhance the aesthetic and emotional value of the day. By tailoring each craft to reflect their unique love story, couples can create lasting memories and delightful keepsakes for their families and friends.

